Friday 25 May 2007

New floor

The welding job on the new floor is now completed. This repair involved a tremendous amount of work and took much more time than anticipated. Now what's left to do is cutting out a new plywood board and install a new carpet.


Dad also removed the water tank from its location, under the rear bed. This is a huge plastic tank that's sitting right on the plywood floor. Dad wanted to make sure that the plywood floor under the tank is not rotten. It turned out that the plywood is in perfect shape.


Meanwhile Dad drained the auto transmission and dropped the pan in order to inspect the filter. A lot of sludge in the pan and a dirty filter are usually signs of something wrong with the tranny. However the pan only had a very small amount of sludge and the filter looked quite clean, wich is good considering the mileage of the vehicle. The transmission will get some new fluid, and since it shifted very well on the road no problems are expected with the transmission.


Today Dad removed the front wheel hubs to inspect the wheel bearings. Everything is in perfect condition. These are very strong heavy-duty truck drivetrain components, and it's still like new.

Sunday 20 May 2007

Floor repairs

Metal work on the driver's side floor is almost completed.


Dad is now working on the passenger side. After getting all the old rotten plywood out, he found that the rust spread all the way to the step at the entrance. So he cut and removed all the rusted metal.


Instead of simply having to cut a single metal plate for the passenger side's floor, he ended up cutting many small plates to rebuilt the step, and then weld everything. That's a lot of work.


The openning seen just beyond the step is the battery compartment. Last night Dad was making final adjustments on the large metal plate for the passenger side. The plate is fairly thick, almost 1/8 of an inch, and quite heavy. To help manoeuvering the plate around, Dad welded a temporary handle on hit with a piece a steel rod. There is a lot of "trial and error" involved in fitting the plate in the Travco. There are almost no straight lines, there are a lot of curves. Dad started with a cardboard model, then used the model to cut the metal plate, but the plate still requires a lot of minor adjustements: install the plate, take measurements, pull the plate out, grind, reinstall, etc. until it fits perfectly.


Saturday 19 May 2007

A good fix

This morning Dad was almost done cutting out a new metal floor. He used a pretty thick metal plate, very sturdy, wich is already painted on one side (that's recycled stuff of course!). A few openings had to be made in the metal sheet: the steering column goes through the large oval hole, some electric wires will go through the smaller one. The half-circle hole is for the brake pedal. Here's the new floor:


Once properly fitted in position, it will be screwed along the side wall with metal screws, sealed with industrial glue. On the opposite edge it will be welded to the part of the original floor that was still in good shape. The other round hole visible in the sheet is the master cylinder fluid service access hole. There was originally some kind of cap covering this hole, but it had been replaced with the lid from an old paint can... wich as you may guess didn't help to keep the water out.


The passenger side's floor should be easier to fix. Dad still hasn't taken the old plywood off yet, but looks in better condition than the driver's side. One thing for sure a replacement metal sheet won't as hard to cut out and fit because there are no holes or opennings like the one on the driver's side. The picture shows some rust on the "step", there is even a hole where it is completeley rusted through.

Friday 18 May 2007

First discoveries

Dad parked the Travco in front of his garage, where it is going to rest for the next few weeks. The Whale is too large to fit inside the garage.
The work begins. The front of the motorhome is raised with a jack and lowered on wood blocks. The front wheels are removed in order to inspect the front suspension and steering components. I gave Dad a hand loosening the wheel lug nuts, as they were extremely tight. We were the both of us on the wrench, lenghtened by a 4ft steel tube, and we had to heat the nuts with the torch to break them loose. For the rear wheels, Dad explained that a special tool will be needed to take the dual wheels off.


The rear window

Seen from the outside, the rear window has been painted over with the same gray color as the rest. From the inside, a piece of white Coroplast (sheet of currugated plastic. Temporary signage is often made of or Coroplast) has been screw over the window to block it. No trims, very ugly work, and there is a water leak from that window.

On this picture, looking towards the back, you can see the white plastic sheet covering the window:


Dad removed the plastic panel, only to discover that the window has been sealed many times with various types of rubber sealants, even foam has been sprayed on the bottom. What a dirty job. And even with all this, water still leaks in!

The good news is that all the stuff they used trying to seal the window is not sticking hard to the fiberglass finish on the inside, and everything should be easy to clean. Water gets in around the rubber seal. This seal is the type that uses a locking strip. The locking strip is missing, the window is not held in place very tightly and this allows water to seep in. With help from his good friend Gerry, Dad correctly sealed the window and installed a locking strip. This should take care of the water leak issue. Inside, some kind of trim will have to be added around the window to hide the holes where the plastic sheet was screwed.

Outside, centered above the rear window, is a metal strip screwed where both halves of the main fiberglass shells meet. The joint at this place didn't look too good and might also be leaking. Just in case, Dad redid that joint, it took most part of a day just to get the rusted screws out. He put some new sealant, and screwed back the metal strip with new stainless steel screws. This can be seen on the next picture. There is still some cleaning to do around the window seal.


At the same time, Dad also resealed the front passenger windshield. This passenger windshield seems to have been installed slightly off-position, as one edge is slightly outside its frame. We'll have to live with this, but at least once correctly sealed it should not leak water anymore.

Then Dad found some rotten wood at the door step. This shouldn't be too hard to fix. The battery compartement is close by, and the cover of the compartment doesn't close quite right, this will have to be fixed also.


Wheel wells

There is quite a bit of rust inside the front wheel wells. That's inside rust, as the outside is made of figerglass and doesn't rust. What is rusted is in fact the floor below the front seats. That's where Dad found the most significant problem so far. The floor is made of a metal sheet (visible from inside the wheel well), a thick plywood, and the inside carpet. The metal sheet is completely rusted out and the plywood is mostly rotten on the edges. As water was leaking in from the windshields, the wood and carpet soaked the water, causing the rust and rot.

Fixing this is a major job. Everything has to come out: steering wheel, front seats, pedals, carpet, etc.
The rusted part of the floor has been cut out with a cutting disk.
View from the inside (yes you can see outside through the hole!):


Original floor:


That's it for now. It's only the beginning!

Let's do it!

Some specs on the Travco:

Lenght: 27ft
Engine: Dodge 440-3, 375hp
Transmission: Dodge 727 3 speed auto.
Rear end: Dana 4.56
Weight: around 14000lbs
Generator: Onan 6000W
Central heating, shower, microwave oven, central vaccum, air conditionning.

Here's the floorplan from the original manual:


This motorhome is is pretty good shape considering it's over 30 years old. A quick mechanical check up didn't reveal anything serious. The engine starts right away and runs great, the transmission shifts normally, the brakes and the six Michelin tires are almost new, road handling is good.

First observations:

-the paint is not the best looking (not just the color choice but the paint itself). It's probably an automotive-type paint, and from the look of a few scratches it appears that the paint doesn't stick very hard to the underlying fiberglass body. The thin red decorative stripes between the blue and the gray part is peeling off at many places. The paint job seem to be 10 or 12 years old.

-There are many water leaks, especially at the front windshields and at the rear window.

-The fridge (original) is an electric-only model. There is no LP gas mode. Apparently the LP gas fridge was optional back then. Dad will have to shop around for a propane fridge.

-Many things will have to be fixed, repaired or improved, because they've been previously installed incorrectly. Many botched jobs. Like the awning post supports, they look like simple pieces of metal hammered down into an approximate shape, bolted to the body with wooden blocks as spacers. There are many examples like this, things that will take time and a lot of work to fix.

-There is some rust under the front wheel wells.

-Mom doesn't like the color of the fabric used for the cushions and curtains. The fabric is of good quality, but I agree the green and pink colors are not very nice. Mom has replaced all the fabrics in the Class C, I guess she will do it again in the Travco.

But these are all small details. Dad's priorities for now are:
-seal the water leaks
-make sure the drivetrain (engine/transmission/differential/bearings/brakes etc.) don't require immediate attention and the vehicle is safe to drive.

If no serious issues show up, the Class C will be immidiately put up for sale. The target is to go camping with the Blue Whale this summer, and they already have reservations for the June 23rd weekend at the Stoneham Campground...

A dream come true

A dream come true.

Dad finally bought what he's been dreaming of for years: a 1975 Travco model 270 Class A motorhome.
That' right, 1975.
No, the thing is not exactly new...


The beast needs quite a bit of work. So I created this blog to document all the work Dad is going to put in his new toy.

But first, some explanations: why would someone go through the pain of restoring a 30 year old motorhome? You need to know my father:

The Project Manager

My father is a trucker. Now retired, Dad worked in the trucking industry most of its life. He's a pretty good mechanic, he's maintained his truck for many years. He does most of his car maintenance and repairs by himself, I can't remember the last time he had to bring one of his vehicles to a shop. Dad tends to keep his vehicles a bit longer than most people usually do: to give you an idea, his current vehicles are a 1981 Dodge van and a genuine 1982 Renault 5 car. Both vehicles are in pretty good shape, and he often gets offers for his Renault. His snowmobile is a 1968 model (that he bought new back in '68) wich still rides perfectly and is used every winter to go to our cottage. My Mom's 1997 Acura 1.6EL is the "new" car of the family (why, it's only 10 years old!).

Tool wise, Dad's garage - wich could be called "the miracle shop" - is pretty well equipped. Dad has pretty much all you can think of, including air tools and compressor, welding equipment, etc.

There isn't much Dad has never done on cars or trucks. The "miracle shop" has seen it all, from regular maintenance and repairs to complete engine rebuilts to paint jobs, utility trailers construction, etc. plus Dad's numerous inventions. Dad's a real handyman, he can fix just about anything. He's gifted with a sense of how things work, he can turn a piece of useless scrap into an essentiel tool or fix something with it (hence the name "miracle shop"). Dad never does anything hastily, he hates botched jobs, he always takes his time and does it right the first time. When he fixes something, it's usually fixed for good.

This is not his first motorhome rebuilt. Dad has completly rebuilt a Class C motorhome that he bought in 2001. This was a small 21ft Class C motorhome built on a Dodge chassis. This motorhome was the RV version of "The Money Pit" movie: not that it cost a fortune to fix, but just about everything on this motorhome had to be repaired, rebuilt or replaced: body repairs, plumbing, electricity, drivetrain, etc. The only thing Dad didn't fix himself was the transmission, wich he took out and sent to a transmission shop to have it checked. Bought in March for a planned trip to the canadian west with friends, Dad worked on this motorhome about 7 days a week until early July, tearing the motorhome apart. When everything was finally ready, he went for a short road test (in fact he went about 2 km away to fill up at the local gas station) and declared to Mom that "everything is fine". They packed up and went all the way to Alaska, and never had one single issue with the motorhome on this 20 000km trip.

My parents still have this small motorhome, with has been used every summer since 2001. But Dad wasn't satisfied. The Class C is small, has no permanent bed, it's a hassle to turn the dinette into a bed every night and back into a dinette every mornig to have breakfast.


Travco


Travcos are to motorhomes what old Airstream trailers are to trailers. Travco motorhomes are made of a fiberglass shell over a steel frame. They are extremely durable. The fiberglass shell is very sturdy and doesn't rust, the mechanical components are heavy-duty, reliable and easy to maintain. There are many Travcos around, especially in the US, some from the 1960's proudly rebuilt by their owners, just like some have done with their old classic Airstream trailers. Owning a classic Travco is not like owning any other motorhome, it's like owning a Harley-Davidson, there is someting special about them.

Dad has been looking at Travco for years. Back then, Travcos were among the first Class As on the road. They were the equivalent of today's large high luxury Class A palaces. Those being way too expensive, a used Travco is the perfect match for a handy man like my father. Dad's been watching the classified for years, looking for a good deal on a Travco. Last month a 1975 model showed up for sale on the web, and Dad bought it.
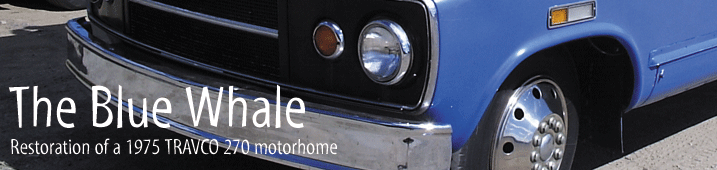
The Blue Whale

The day Dad brought the Travco home, Mom sent us an email stating: "the blue whale is home". The Travco is indeed blue and gray. These are not the original colors, it's been repainted, and not with the best color choice in my opinion. But first things first, the paint color is quite low on the priority list for now. However I believe the "Blue Whale" name will stick.

A few pictures of the Blue Whale the day it arrived home: